Tuesday, June 23, 2015

Anchors away! Building a pirate ship part 3

Based on the rigging schematics in Part 2 I used elastic cord for the rigging. The reason for this will become apparent below, but in any case it will enable you to make some nice and tight lines. All the standing rigging is in black, as it is supposed to be. Standing rigging did not need to move and was tarred for durability. Running rigging, used to hoist and manipulate sails, needed to be flexible and was therefore not tarred and hemp-coloured. Failing to find light brown elastic cord, I forewent this difference. 


As I drilled holes in all the masts and yardarms running the rigging was as simple as running it through the holes and tying knots to fix it in place. Don't forget to put some superglue on each knot to keep it from slipping once everything is in place!

Take care not to glue in place anything else. The tension on the cord is quite sufficient to hold masts and yardarms in place without glue or other attachments.


Below are some details of how the cord runs through the holes and how the sails have been furled and sowed in place. I really wanted to add sails, but decided for furled sails to be able to easily reacht the deck during play.


A learing point below: you will see how the stays bend over the railing. I should have attached the knotting point higher up, so that the stays would clear the railing while running upwards.


 I made several flags for the Reaper, so I could sail her as a pirate ship, a privateer and a British Navy ship.

Glueing bits of plastic tube to the masttops enables me to easily switch flags.


Some last paint touch-ups, finishing the figurehead and the nameplate on the stern and here she is: finished for as much as I want to finish her before the first game: HMS Reaper and crew!


The finished figurehead.


Some additional freehand on the nameplate. 


And now the final test and the reason I used elastic cord for the rigging. When you remove all the loose parts you can pull the masts out of their sockets as the cord gives way and fold the entire rigging back for easy storage and transport. A trick I read somewhere and gratefully borrowed for this project!


And just as easily he is put back in order again!


Arr me mateys!  Hoist the mainsail! Battle stations! The Reaper is coming!


Monday, June 22, 2015

Splice the mainbrace! Building a pirate ship Part 2

Before making the masts I had to decide on the rigging. Googling around I found this brigantine that looked perrect for my ship. 

I dug around for bits and pieces and found enough dowel and chopsticks to fashion me some masts and yardarms. I even had a steeringwheel that I had bought for the Barsoom ships (ssshhh. don't tell anyone).


Lazy bugger that I am I fastened the mast parts with ductape. If it works for the Myth Busters, it certainly works for me!


Here the stays will be fastened. Being a wargaming ship model, the rigging must be severely simplified to enable the players to reach the deck at all.  I also added decorative ridges on the hull to suggest the lines of the planking. These were made of wood from wickerwork diner placemats. I have no idea what kind of wood it is, but it is soft and very flexible.


Some fitting of the masts.


Here the ductape is covered with cable made from a couple of shoelaces. The problem with modelling on a Sunday is that all the shops are closed and you have to make do with what you have at hand....


An old plastic zombie provided the figurehead. And the ship's name: Reaper.


Fitting yardarms. Since I measure as little as possible most parts are made "on the eye" and have to be fitted before assembly.


Long long ago my father made these two brass gun barrels for me in 20 mm scale. In the scale of this ship they make excellent swivel guns! I fitted them on pintels made from plasticard and tube.


All the parts together before painting. I decided to paint the parts first before rigging the ship, as you can't easily reach some things anymore as soon as the ship is assembled completely.


And here she is with her coat on!


A learning moment: fitting the figurehead before painting was not smart. This part still needs some work.


So on to the third and last part: making the rigging and the sails.

Missed the first part? You'll find it here. Part 3 is here.

Sunday, June 21, 2015

Heave to! Building a pirate ship! Part 1.

Having enjoyed myself mightily in a recent game of Legens of the High Seas, I decided my collection sorely lacked a pirate ship. I Googled around a bit and decided to build one myself based on Gary Chalks designs. 

The Chalk templates look like this...


and result in a 4-gun brigantine. I decided to enlarge the ship a bit and lengthen it to 6 guns. So I drew my templates on printing paper and carefully measured out all the needed parts. It's a bit of dull work but will save a lot of work later on. 

Then I drew the needed parts on foamboard and started cutting. 


I measured the gun-ports to my collection of plastic guns, remnants of a long ago acquired Pressman Pirate Battle Game. And built the rest of the ship around it. After all, a warship is simply a means to transport guns to the appropriate place to fire them!


After cutting out the parts from a piece of 5mm foamboard I engraved a planking pattern in the decks using a wheel knife.
 The result was a pile of foamboard parts, ready to be glued together.

I managed to burn my fingers twice on the hot glue gun (do NOT try this at your own home)

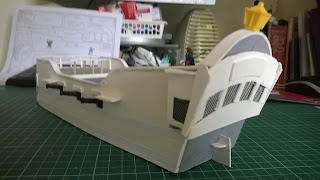
The ship's outer hull gave me some thought, but in the end I decided to make it from thick cardboard, usede for framing pictures. It is a b*tch to cut, but is very smooth and strong. And it will curve well so would follow the lines of the hull.


After adding the bow stem and ornaments I kept adding details like railings (cardboard and kebab sticks), door- and gunport frames et cetera. You can keep doing this for quite a while...


I fitted the guns on the gun deck and was relieved to see they still would fit!


The stern castle was made from cardboard as well. I used fly net mesh for the windows.


That being enough for today, I dropped anchor and retired to my bunk. Tomorrow more detailing and rigging!

Part 2 is here.

Part 3 is here.